
How to make film strip projector? It is what people are asking for these days. Well, you can’t make a DIY film strip projector because it is very sophisticated equipment. Similarly, its working is also very complicated that’s why you have to understand it before you can use it.
In this blog, we will explain everything you need to know about a film strip projector, its design, uses, and how its working is different from modern best home projectors. So, let’s get started!
What Is A Film Projector?

A filmstrip is a type of projective audiovisual that consists of a set series of still images on a roll of 35 mm film. As the teaching circumstance requires, the filmstrip can be projected on the reverse of the map.
The filmstrip can be projected on the back of the map if it is more suitable for the teaching circumstance. An inserted filmstrip is set vertically down in front of the aperture of the projector, rather than horizontally, like in a slide projector, to simulate the appearance of 16mm film.
Filmstrips span a wide variety of subjects. The teacher needs to tap the proper strip type for his educational purposes.
Design Of Film Strip Projector
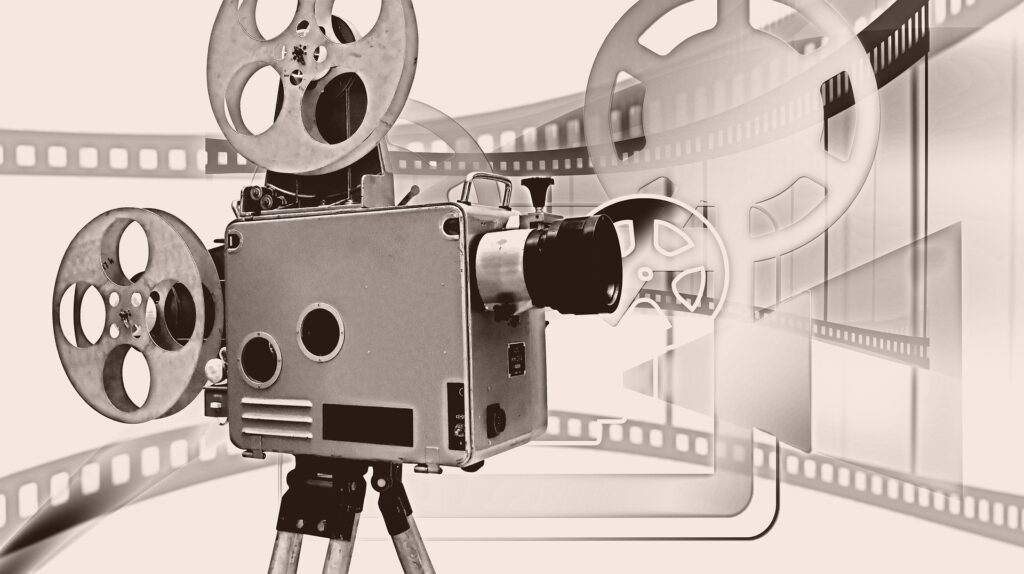
A filmstrip is a spooled roll of 35 mm positive film with 30 to 50 pictures ordered in a sequence. Most filmstrip and slide projectors use a blower fan to keep the film from burning. In contrast to a slide projector, a filmstrip is put vertically down in front of the projector aperture.
As a result, the frame size is less than that of standard 35 mm film. A filmstrip picture frame takes up the same space as a single 35mm frame, including its guard band. Hence a 25-exposure 35mm film may hold 50 filmstrip images.
The high and continuous heat of the projection lamp melted or combusted early celluloid film strips.
While it is more challenging to create filmstrips of consistent quality in-house, and while slides allow greater flexibility for in-house adjustments in the program, bespoke laboratories may make filmstrip presentations more inexpensively than slide programs in quantities of seven or more.
The available filmstrip projectors for both sound and silent presentations are evaluated, and a table comparing the characteristics of nineteen typical sound filmstrip projectors is supplied. Therefore it is hard to make a filmstrip projector at home since its parts and assembling are impossible to be done at home.
You can also check: Top 11 Best Speakers For Projector In 2022.
Uses Of A Film Strip Projector

A filmstrip is a collection of still images on a single roll of film. They may convey a narrative or describe the processes of better practice. A filmstrip projector is required to show filmstrips. Some projectors do not require power. Because the machines are simple to use, this is an excellent method of instruction as visual education.
You may keep a photo on the screen for as long as you need to discuss it. Filmstrips provide an additional advantage. In one brief meeting, you may demonstrate a whole process, such as rice cultivation.
Some filmstrip projectors have a slide display adapter. There are also slide projectors that are simple to use. Slides can be used similarly to film strips.
Most filmstrip and slide projectors use a blower fan to keep the film from burning. Always hold the film by its edges. Fingerprints will be visible in the projection. If your film becomes filthy, clean it with a delicate cloth wet in carbon tetrachloride or acetone.
They should be set back somewhat from the screen than your 16 mm motion picture projector. Because slide film is more significant, your projector should be positioned closer to the screen for slides.
To switch between filmstrip and slide heads, release the thumb nut, remove the filmstrip head, insert the slide head, and tighten the nut. Always keep two slides in the carrier to avoid white glare on the screen.
While the last slide is in the machine, turn off the projector light. Allow a colleague to switch on the room lights at the same time.
Check out our 11 Best Projector For Bedroom – April 2022 Edition!
6 Easy Steps – How To Make Film Strip Projector Work?
Now that you understand the design and uses of a film strip projector, it is time to learn how does this work? Here are the 6 easy steps you need to perform to make film strip projector work.
Step No. 1: Locate The Front Reel Mount
First of all, you need to locate the front reel mount. In order to do so, take a look at the base of your projector. You will see a small knob on the side. It is the front reel mount. Most machines have the front reel mount somewhat higher than the projection lens, usually just above the front support.
Note that the front reel mount should be large enough to hold the film reel.
Step No. 2: Locate The Rear Wheel Mount
After finding the front reel mount, the next thing that you have to do is to locate the rear wheel mount. It will be facing the projector’s back. Once you have located the wheel mount, put the empty take-up reel onto it.
Step No. 3: Feed The Film
Feed the film through the glass sandwich upside down. You will notice that the words read backward when you glance at the video while weaving. Ensure that the transport mechanism appropriately engages the film perforations.
You will know that it engages the film when you see a tiny sprocket near the bottom of the glass sandwich. Also, make sure that the video is not loose.
Step No. 4: Adjust The Focus
Move the framing lever up or down to frame this image correctly. Sharpen the focus by rotating the lens. Turn the film advance knob to advance the strip frame by frame. If you are projecting from someone else performing the speech, set up reliable signals to move one frame at the appropriate time and then move to the next frame.
After each screening, rewind the film so that the beginning is outside. Wrap it neatly and store it in its appropriate box or cane.
Step No. 5: Roller Arm Button
After setting up the projector, locate the roller arm button and push it. Usually, this button is towards the top front of the projector. The roller arm is revealed when this button is pressed, opening the projector’s interior. This little gadget feeds the film from the reel to the machine.
Look for the picture through the tiny aperture on the front of the projector, right above the lens. Begin by placing the front reel mount into the slot. If there are sprocket holes on one side of the film, you have to position the reel so the spots are closest to the machine. Allow enough space when you feed the film into the slot for the strip to remain loose.
Step No. 6: Connect The Projector
Lastly, you have to connect the projector to a wall outlet. After this, power on the motor by flipping the required switch. Once the engine has started, turn on the projector bulb to begin watching your movie.
Most devices have power switches with labeling on the front or side of the projector body. Turn the focus ring around the projection lens for a clear and sharp focus. Here, you can consider using a cooling fan because these vintage electronics don’t have cooling systems.
It is how to make film strip projector work in 6 easy steps.
Here is a list of the top 11 Best 4K Projector Screen In 2022.
Frequently Asked Questions
Q: How do you put film on a projector?
Putting film in a projector can seem intimidating at first, but with a little practice it becomes a simple task. Start by turning on the projector and ensuring that the lens cap is off. Remove the empty reel from the front gate and lay it flat on a table.
Unroll a small portion of film onto the reel, making sure to line up the holes in the film with the sprockets on the reel. Then, guide the film onto the sprockets while rewinding it onto the empty reel.
Once all of the film has been rewound, replace this full reel on the front gate and reattach any perforated leader or trailer strips that were removed before rewinding. Lastly, adjust any tension knobs as needed and press play to begin projecting your film.
Q: How do you put pictures on film strips?
Gather your supplies; you will need an unexposed roll of 35mm film, scissors, and your choice of photos or images (printed on regular paper or photo paper). Cut the individual images to fit snugly onto the length of the film strip, leaving a small border around each one.
Carefully place them onto the film strip, making sure to keep the images in the correct order. Finally, load the strip into your camera (consult your camera’s manual for specific instructions) and proceed with taking your photos as usual. In no time at all, you will have a one-of-a-kind collection of photographs on film strips!
Bottom Line
There you have it, how to make film strip projector work. A film strip is a length of the film organized in sequence for individual projection as a teaching aid in schools and comprises still pictures, generally of diagrams, charts, and other graphs. Making a DIY filmstrip projector is difficult due to the difficulty of assembly.
Before exhibiting the film strip to an audience, you must first preview it. During the preview, pay attention to the chronology and substance of the film strip and, if available, study the associated instructional notes. Determine the significant points of instruction.
That’s all we got for you today. We’ll meet you with a new topic soon. Till Then, We Are Rank Projectors. Have a good day!
Thanks for reading!
You Can Also Check: